Business Central: OptiPick guide
Below is a schematic overview of how the pick process is typically handled today in Business Central (on the left) and how it would look like after integrating with our OptiPick API (on the right).

The entry point of the flow is when Sales Orders are registered in the system, when these are ready to be fulfilled, they are placed in the "Released" status. Through different business rules, different groups of Sales Orders are converted into Warehouse Shipments. No separate distinction is made between dividing Sales Orders into waves (larger groups of Sales Orders with e.g. the same carrier or pickup time) and the grouping of Sales Orders within a single pick route. These Warehouse Shipments are then converted into Warehouse Picks and Warehouse Activity Lines afterwards, which allocates a certain location (Bin Code) to each pick. Finally, these activities can be assigned to people on the floor and executed.
The OptiPick API should be called after Business Central has resolved source bins for the candidate orders in a wave. In practice, this means first generating pick suggestions (e.g., by creating Warehouse Picks or simulating the pick creation) so that each line has a Bin Code. The full wave (potentially spanning multiple Warehouse Shipments) is then bundled into a single OptiPick request, allowing OptiPick to cluster orders into optimal routes subject to stop conditions (e.g., trolley capacity). The request ideally includes the original Warehouse Shipment ID, the as-is pick sequence (BC's Bin Ranking order), and each line's Bin Code and quantities. This enables OptiPick to compute both "as-is" and "optimized" distances and provides a safe fallback: if the optimization cannot be applied, the originally created BC picks (or their bin-ranking order) can still be executed unchanged. To apply the optimized plan, you can either re-sequence existing Warehouse Picks when clusters align with current routes or recreate picks per OptiPick cluster (via the Pick Worksheet/creation codeunit) so each cluster becomes a single picking route on the floor.
In the remainder of this guide we demonstrate, in a sandbox environment, how we can generate a request (JSON format) and send it to our API. We'll add different elements to the BC UI to configure the necessary parameters and trigger these optimizations manually. Ideally, these optimizations are of course triggered automatically and results should be persisted in the necessary data tables of BC.
Required API data
Below is a minimal JSON (with truncated information) for the /optimize/cluster endpoint which can do both batching of Sales Orders into picking routes, as well as determining the optimal sequence of the Warehouse Picks within such a route (which is typically done in BC by sorting by "Bin Ranking").
{
  "site_name": "Example",
  "start_points": ["START"],
  "end_points": ["END"],
  "picks": [
    {
      "pick_id": "pick_1",
      "location_id": "BH-06",
      "order_id": "order_0",
      "wave_id": "wave_0",
      "list_id": "list_0",
      "asis_sequence": 0
    },
    ...
  ],
  "parameters": {
    "max_orders": 2,
    ...
  }
}
Only the following two attributes are required at root-level of the request:
site_name: a reference to the floorplan in our OptiPick web application. This is is necessary to know the distances between all locations in the warehouse.picks: a list of Warehouse Tasks that need to be executed.
For each pick, the following attributes are required:
pick_id: a unique ID for each element. These will be reused in our response so you can easily link back to your input data.location_id: where to pick from in the warehouse. OptiPick supports multiple locations in case SKUs are spread in the warehouse.order_id: an identifier that groups picks for the same customer together. Picks with the same order_id are always picked within the same picking route (Warehouse Order)
Additionally, the following attributes can be specified for each pick:
wave_id: our algorithm applies grouping on each wave separately. Often these are all the orders that have to be picked up by a specific carrier at a specific pickup time.list_id: an identifier grouping picks together according to the logic of BC. These correspond with a Warehouse Shipment. As explained above, calculating & providing this is recommended. It serves as a fallback mechanism and allows to calculate the distance savings.asis_sequence: the sequence order, according to the BC logic, in which the picks are executed within a pick route (typically a pick snake formed by sorting on "Bin Ranking" associated with every location in the warehouse). OptiPick supports grouping optimally according to the pick snake by setting one of the parameters. To allow for this, the raw sequence values (so not the index after sorting) have to be provided.
Finally, different parameters can be provided that control the routing & clustering policy, stop conditions (under which conditions no more pick tasks can be added to a pick route), regexes to convert location IDs from the WMS to locations known to the OptiPick webapp, and more.
BC Data tables
Warehouse & SKU Locations
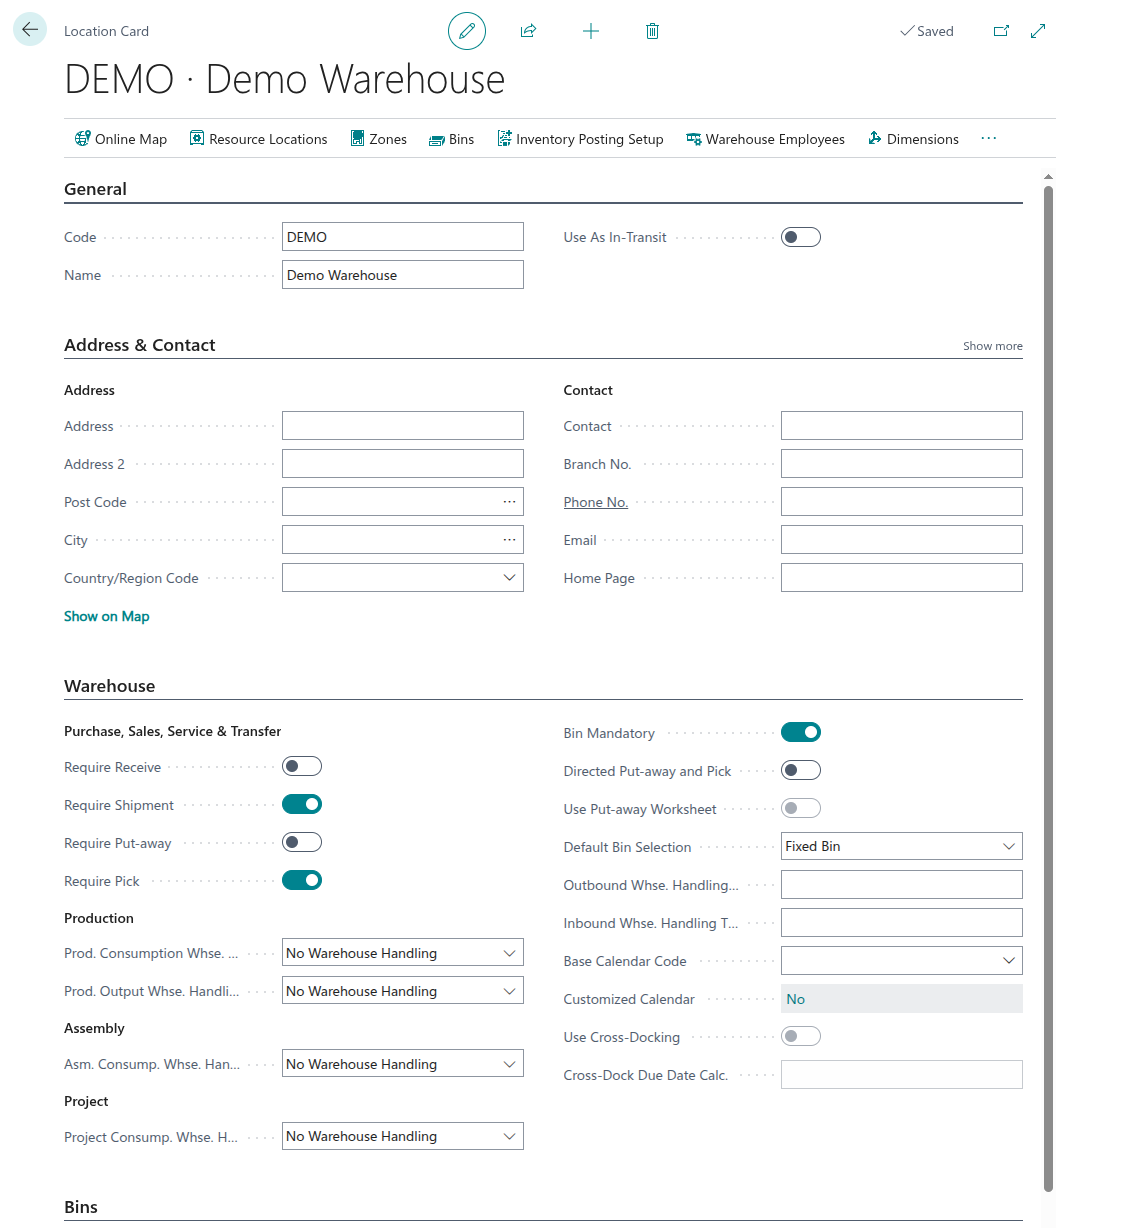
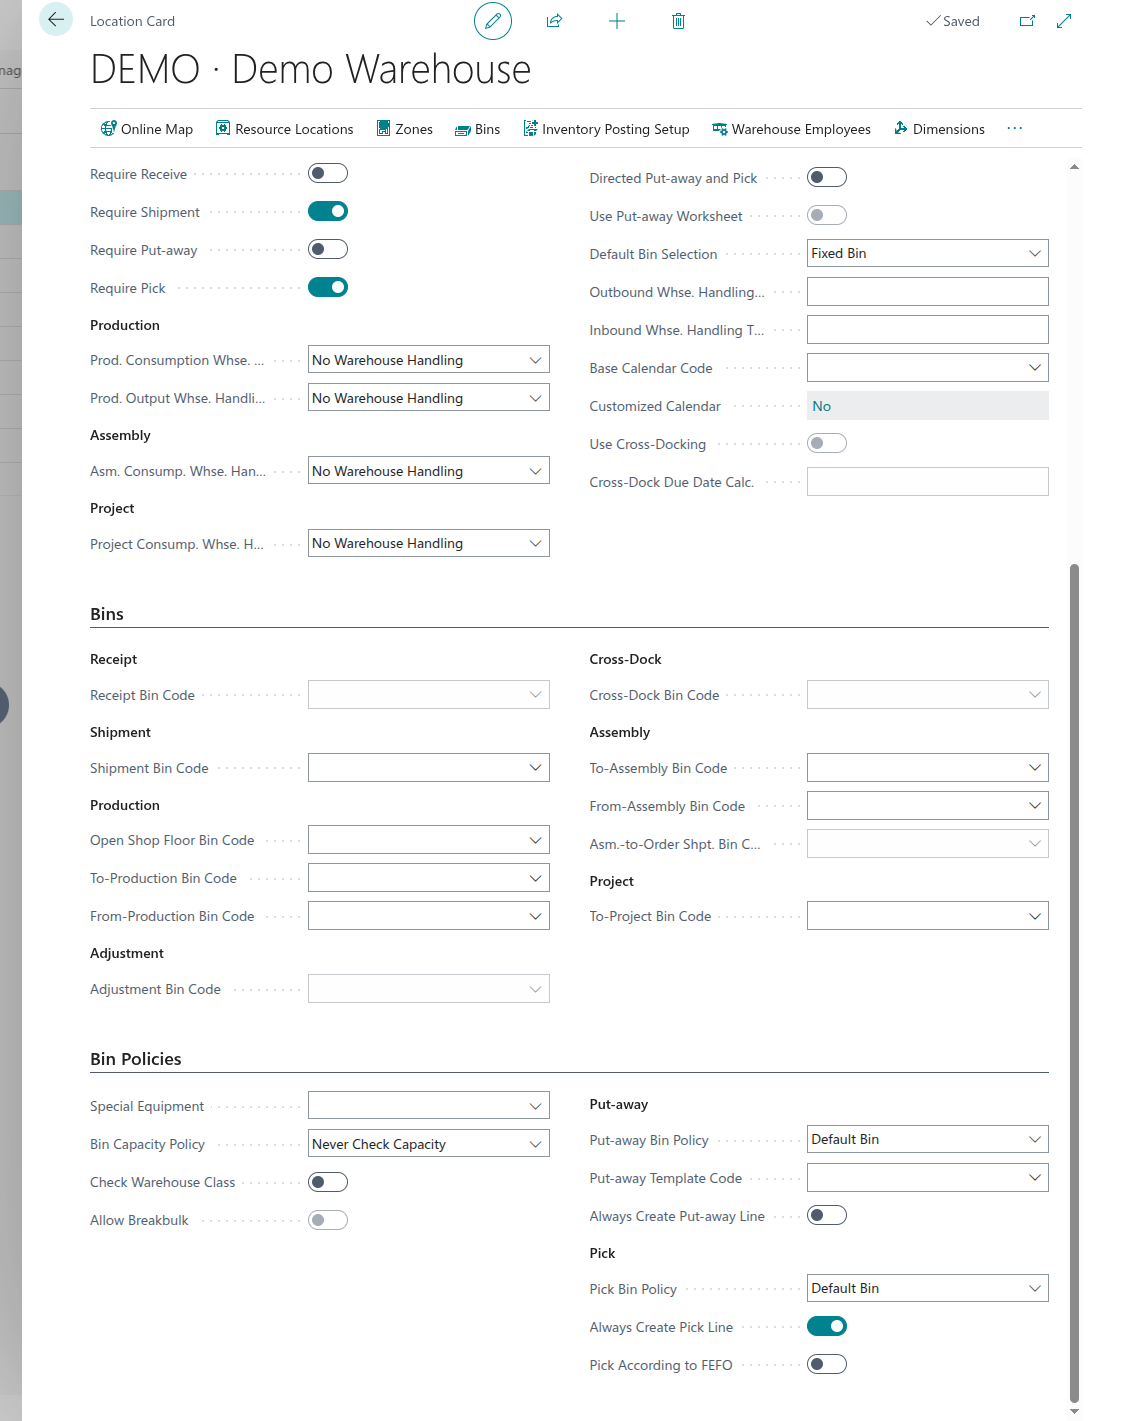
Let's create a simple DEMO warehouse with a couple locations in Business Central. We use the Tell Me / Search function (ALT + Q) to navigate to Locations and click on "+ New". We will enable "Bin Mandatory","Require Shipment", "Require Pick" and "Always Create Pick Line". We set the "Default Bin Selection" to "Fixed Bin".
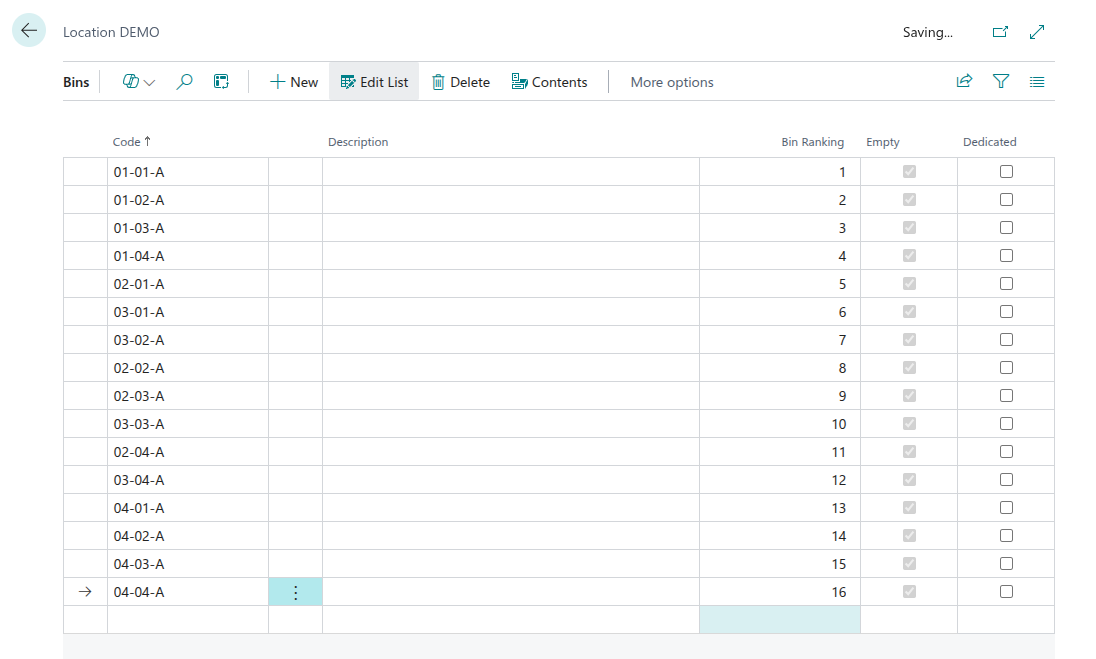
Once created, we can go to the "Bins" tab to configure our locations. We'll make a small warehouse with 4 aisles, each having 4 different bays and associate a "Bin Ranking" to each.
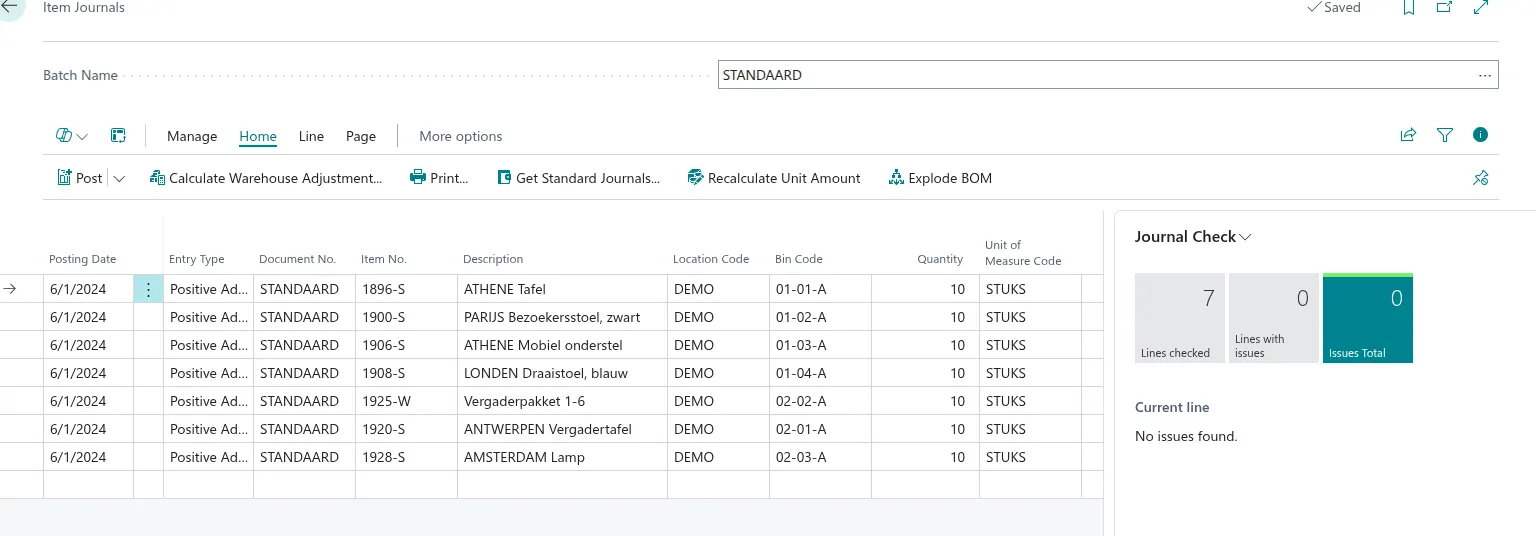
From here, we can navigate to "Contents" to assign SKUs to these locations

When this is done, we need to re-stock each of these locations. This can be done by going to Item Journals (through Alt + Q).
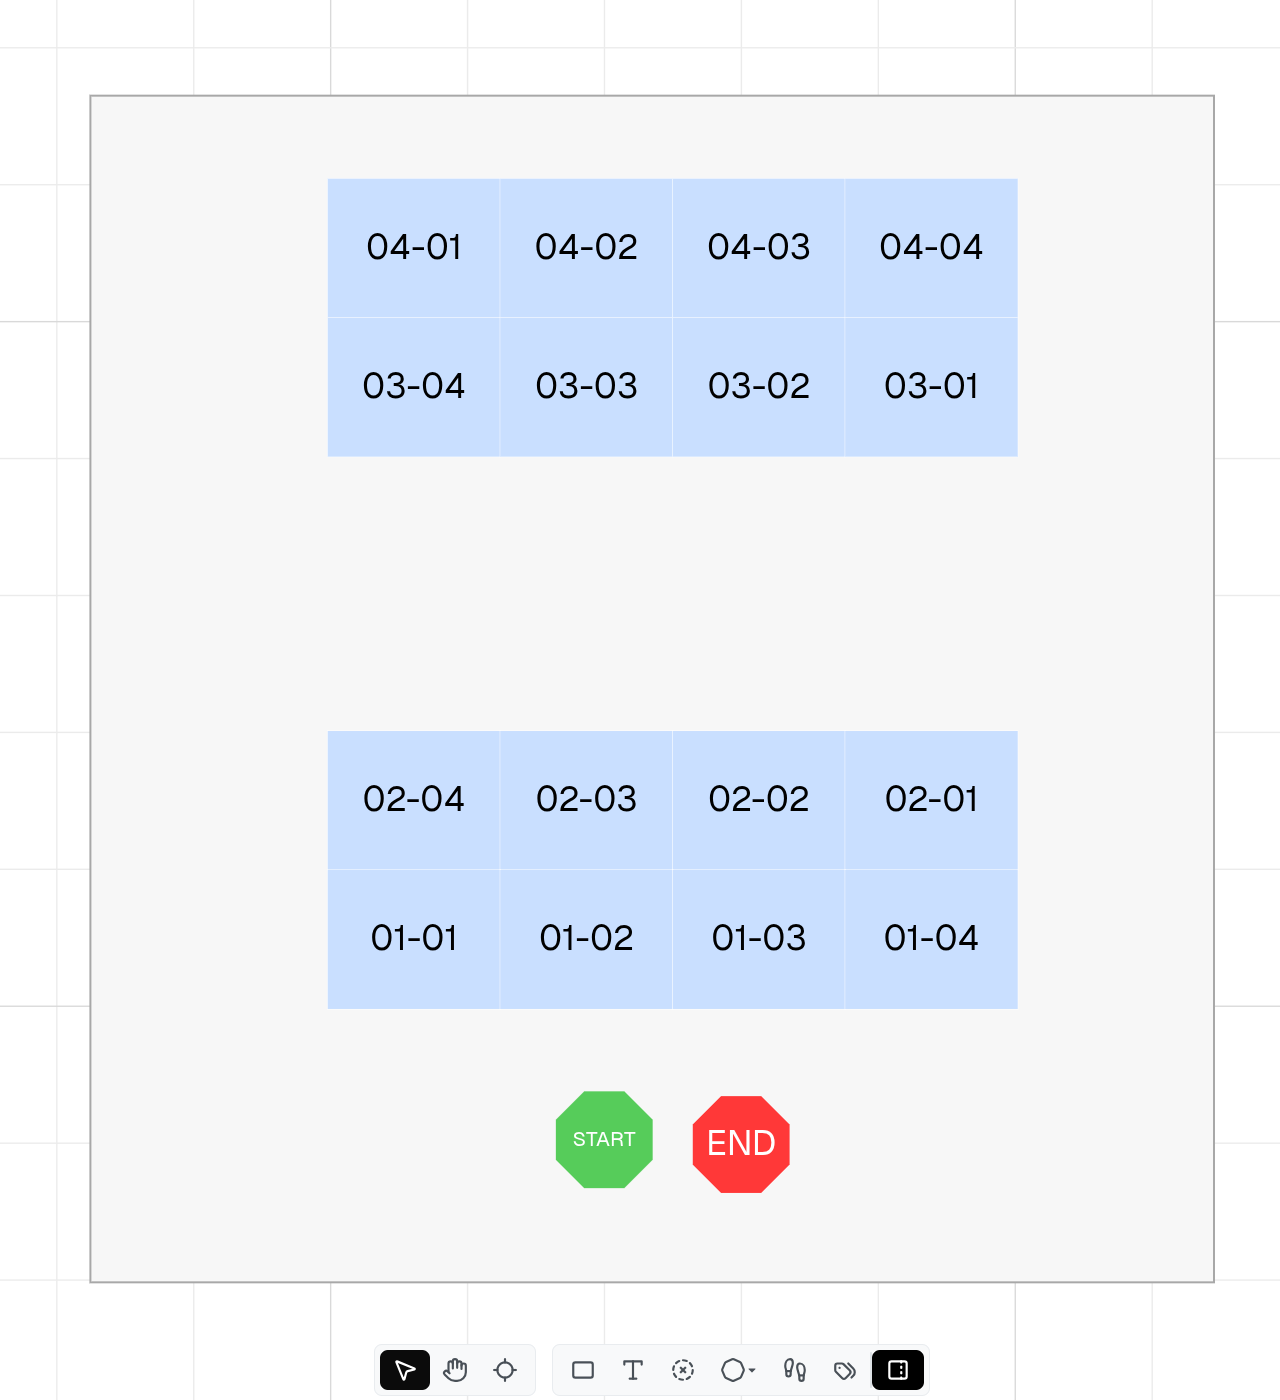
OptiPick Floorplan
We also need to create a floorplan in the web application of OptiPick (https://optipick.optioryx.com/). This is necessary for our algorithms to be aware of the distances between all points within your warehouse.

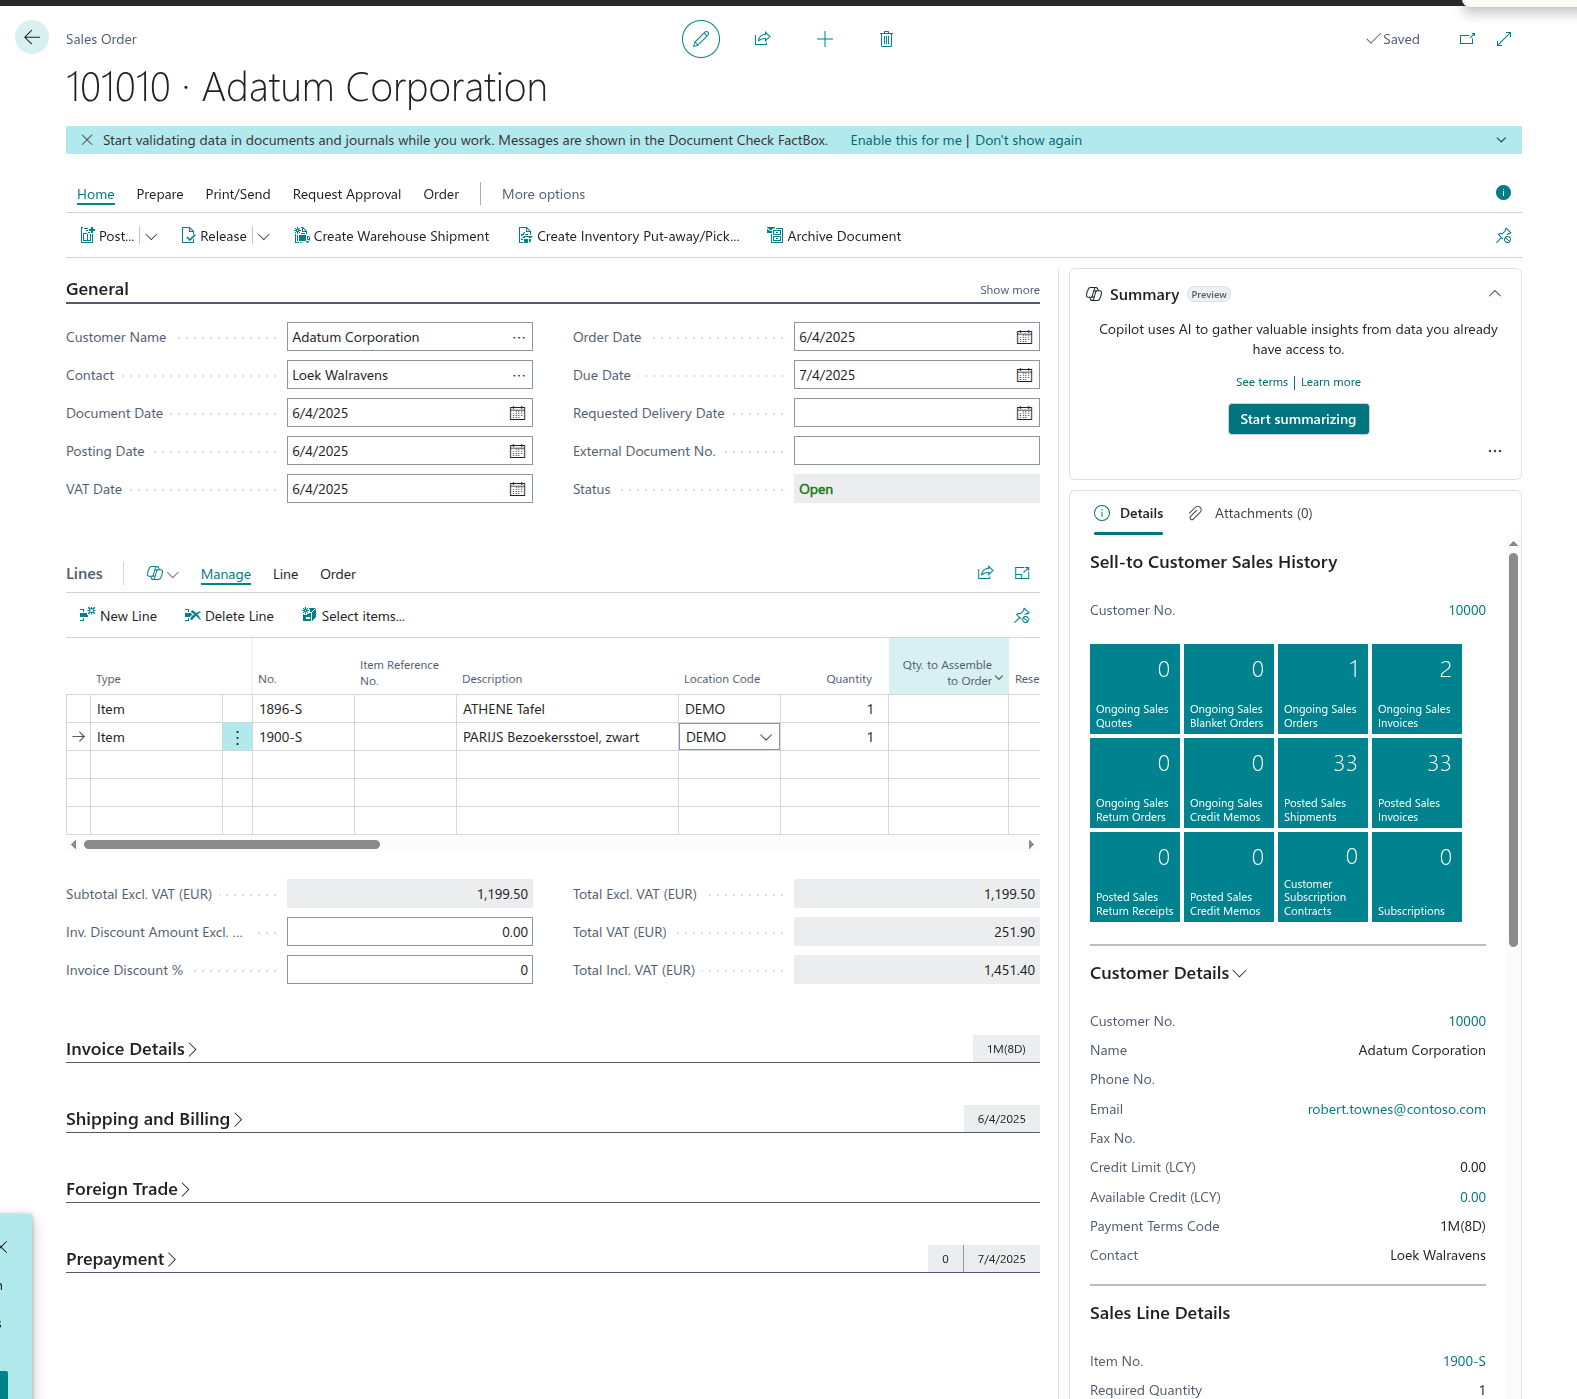
Sales Orders
We now create a few ales orders, using items that have been assigned to a bin location in a previous step. Make sure to put each of the created sales order into the "Released" status in order for them to be picked up in the next Warehouse Shipment step.
Warehouse Shipments
Once the Sales Orders are created and Bin Codes are resolved, we can bundle these into Warehouse Shipments which correspond to a picking route. We can navigate there through ALT + Q > Warehouse Shipments, then click on "New" and go to the "Prepare" tab. After filling in our Warehouse Name (DEMO) we can click on "Get Source Documents" to select the Sales Orders to group together.
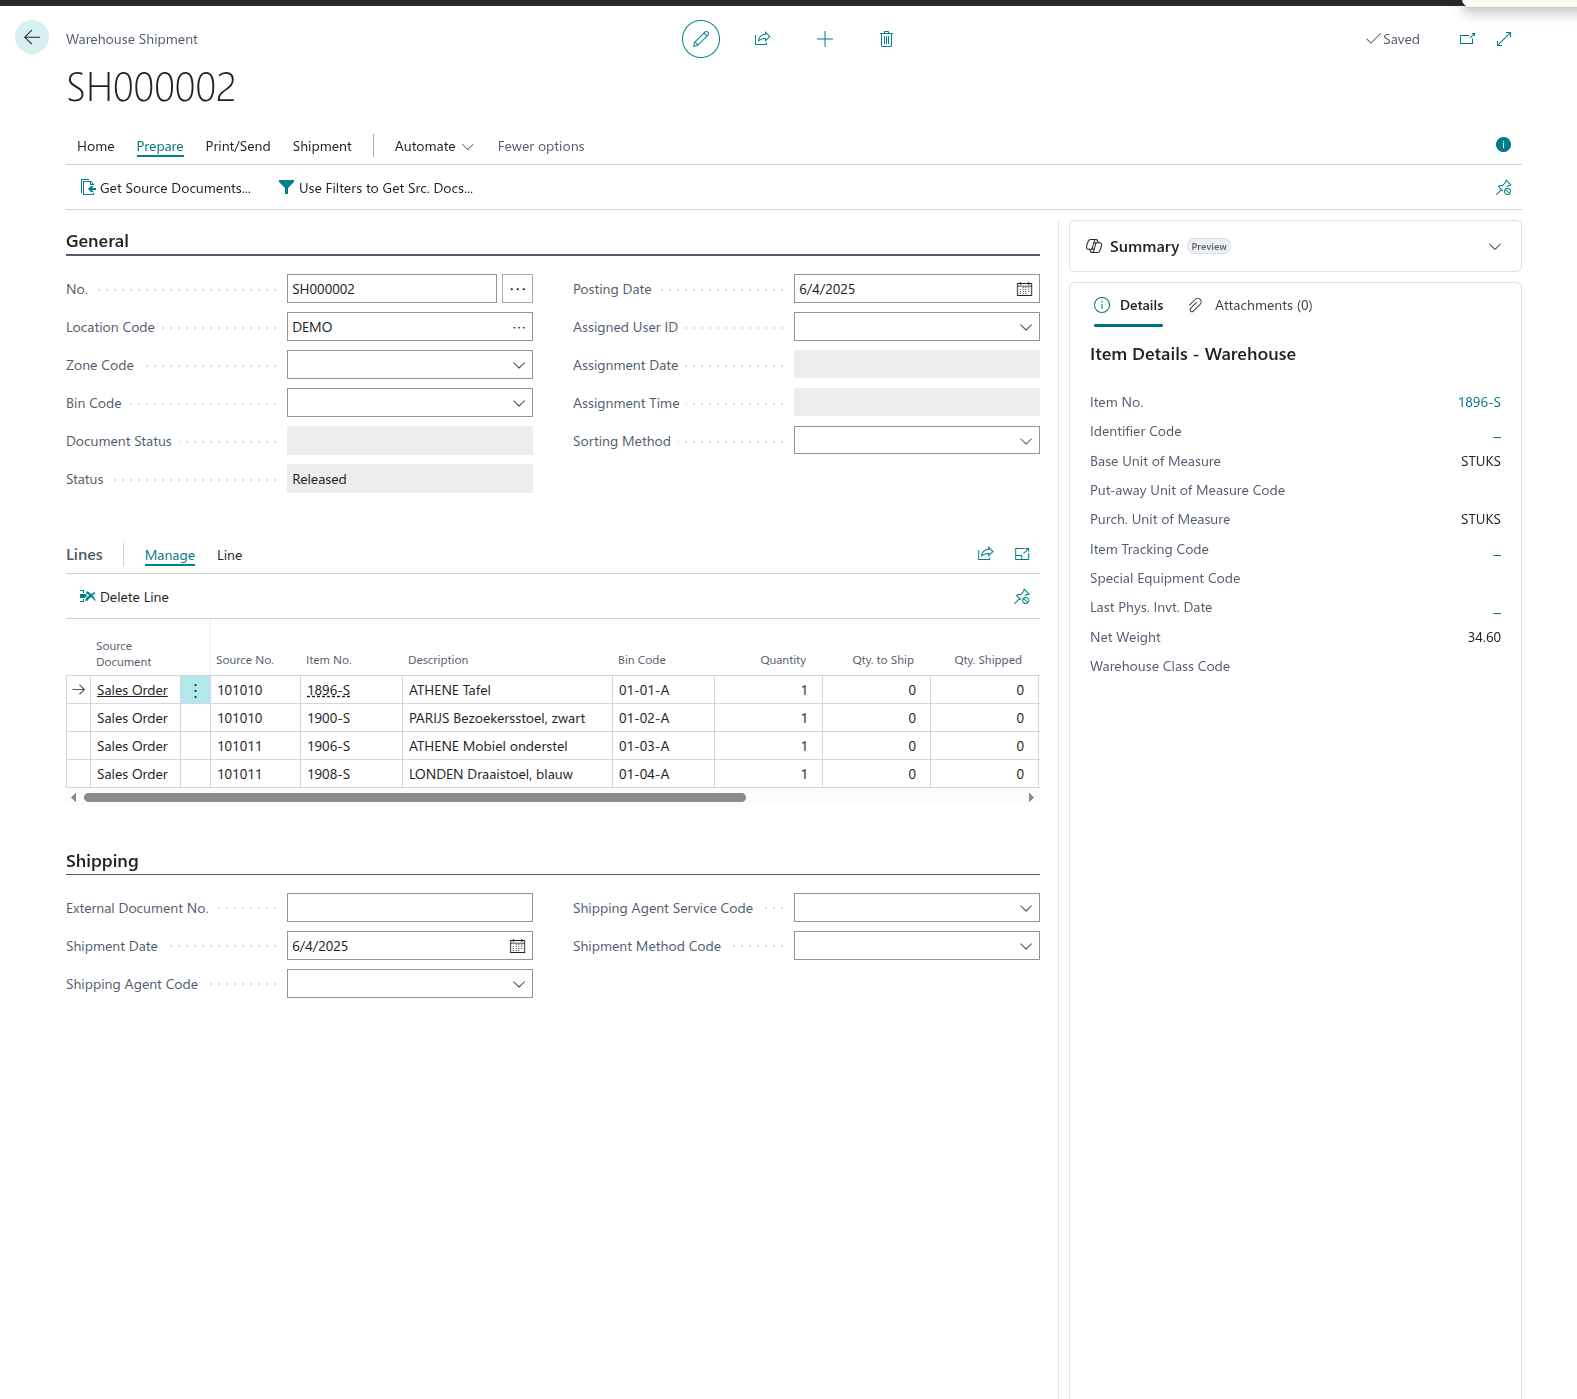
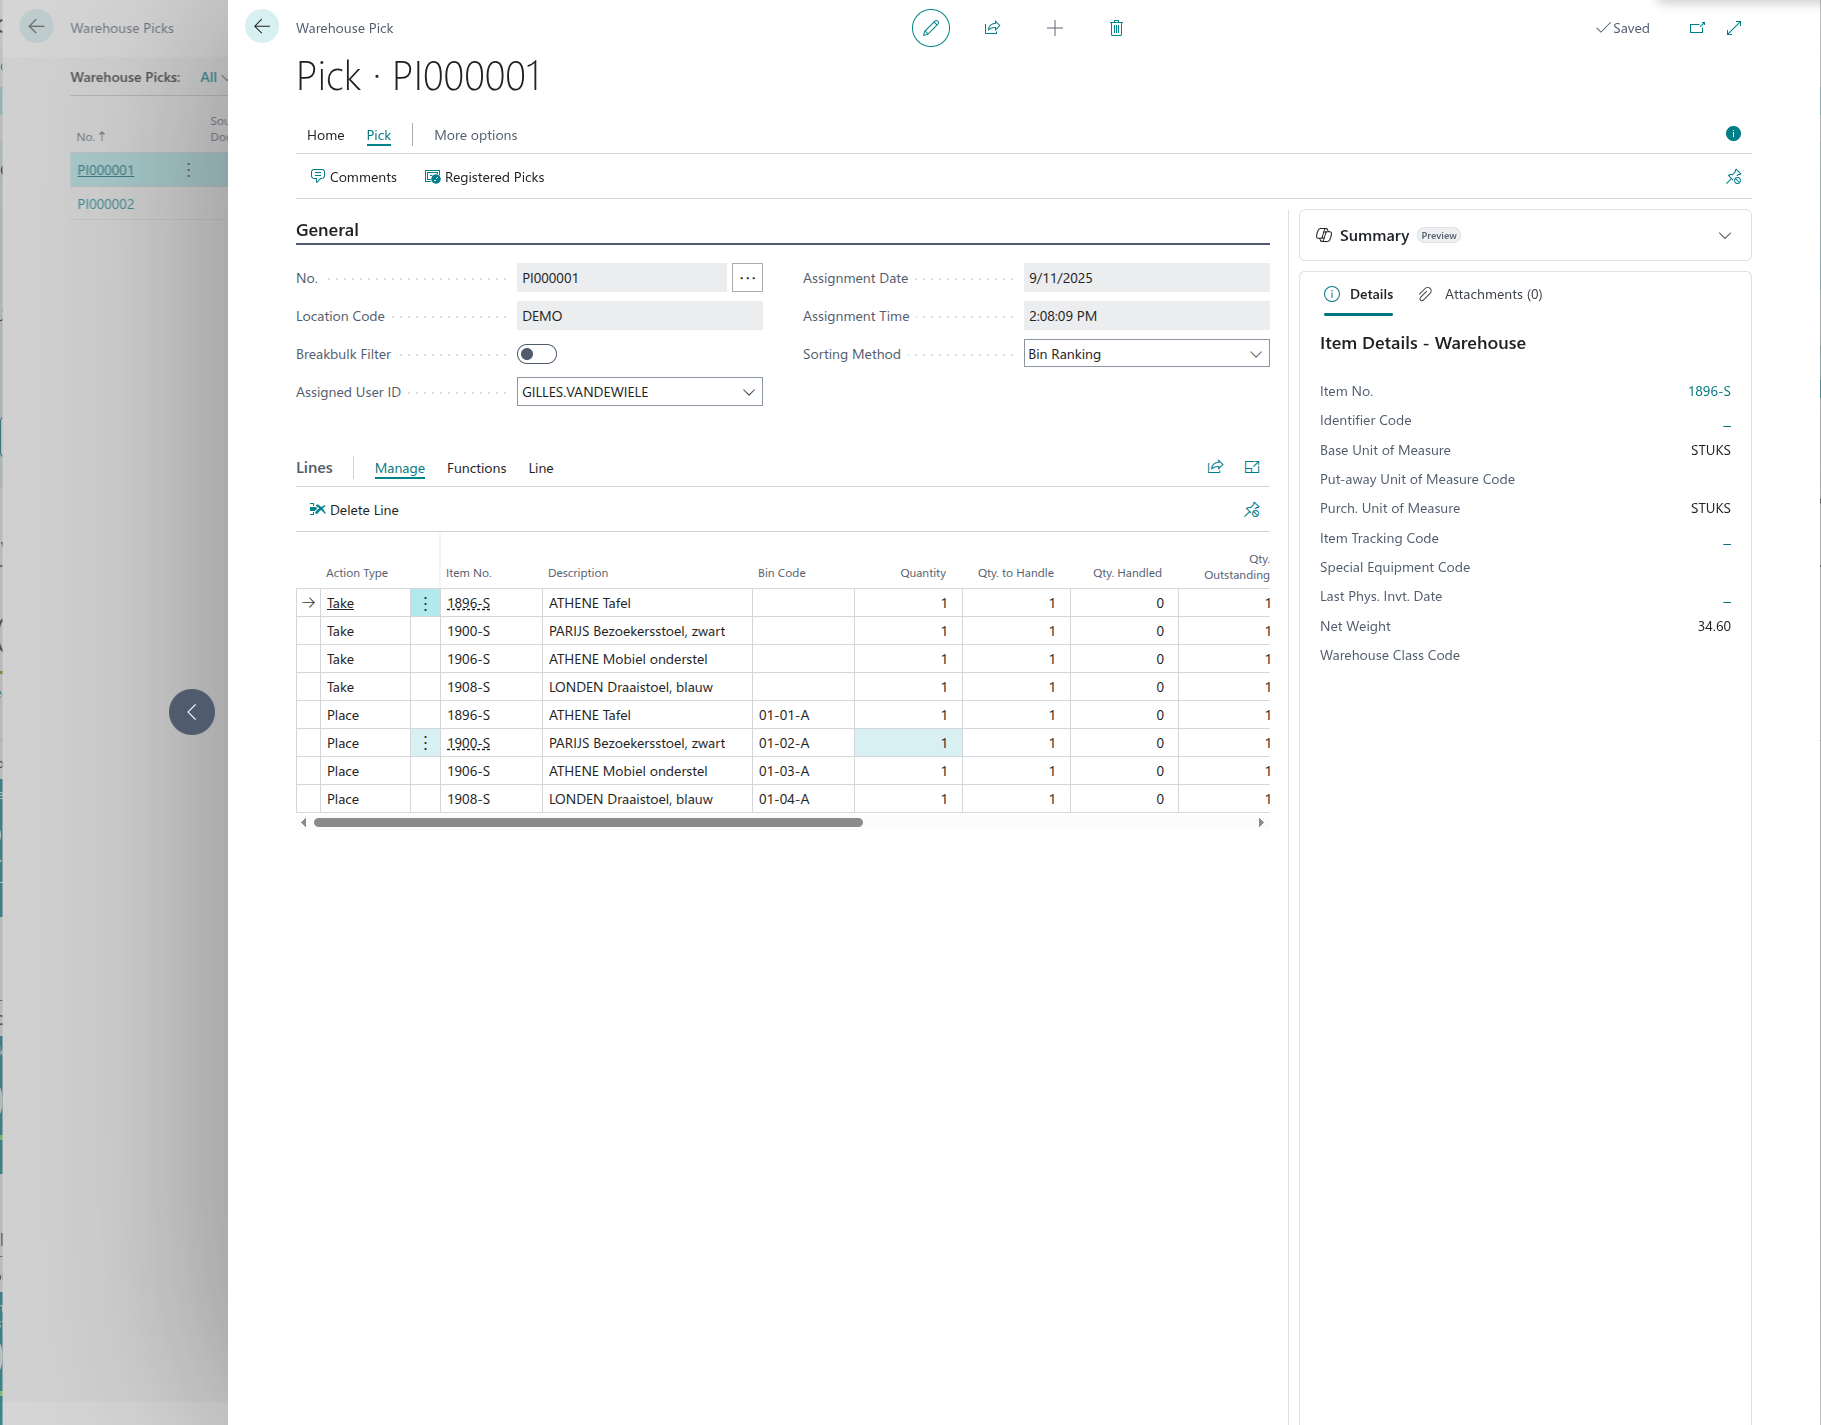
Afterwards we can turn these into Pick activities in the "Home" tab and clicking on "Create Pick". In what now follows, we will call our own API to group Sales Orders into picking routes.
Integrating OptiPick API
Setup
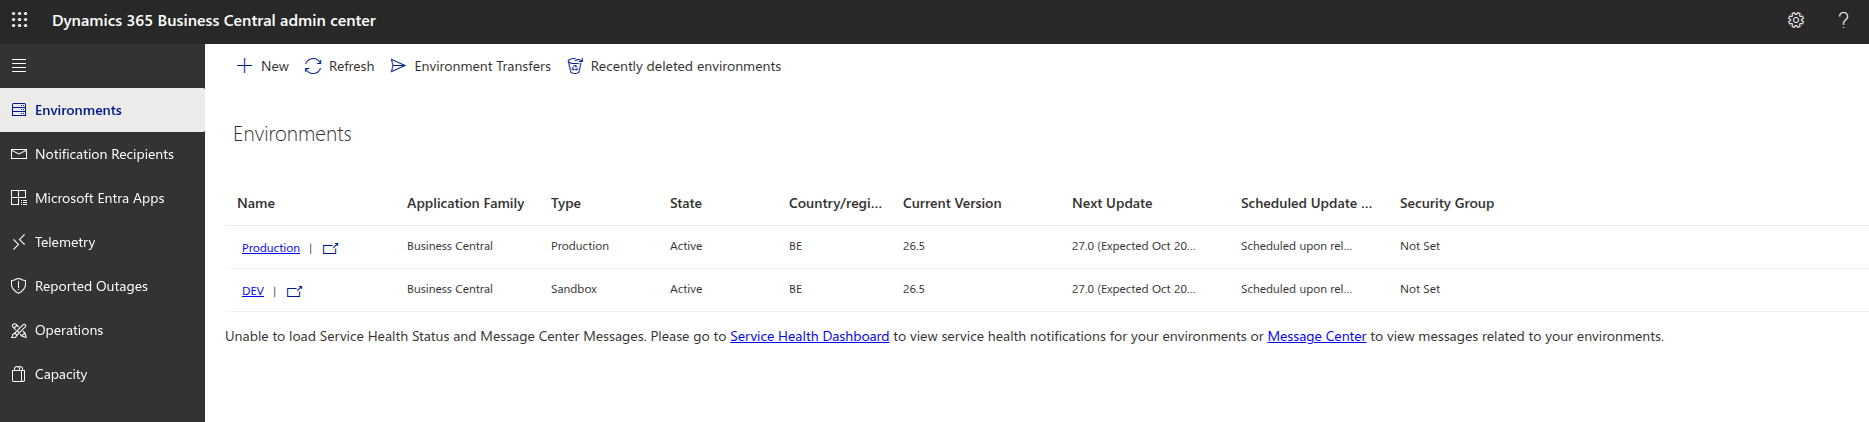
We first create a new environment using the Admin Center which can be accessed through https://businesscentral.dynamics.com/[TENANT_ID]/admin
After creating a new sandbox development environment, we create a new AL project (VSCode has excellent plugins for this) and configure our app.json and launch.json as below:
{
    "id": "<CENSORED>",
    "name": "OptiPick",
    "publisher": "Default Publisher",
    "version": "1.0.0.0",
    "dependencies": [],
    "platform": "1.0.0.0",
    "application": "26.5.38752.38944",
    "runtime": "15.2",
    "idRanges": [
        { "from": 50100, "to": 50149 }
    ]
}
{
  "version": "0.2.0",
  "configurations": [
    {
      "name": "BC Online",
      "type": "al",
      "request": "launch",
      "server": "https://api.businesscentral.dynamics.com",
      "environmentName": "DEV",
      "tenant": "<CENSORED>",
      "schemaUpdateMode": "Synchronize"
    }
  ]
}
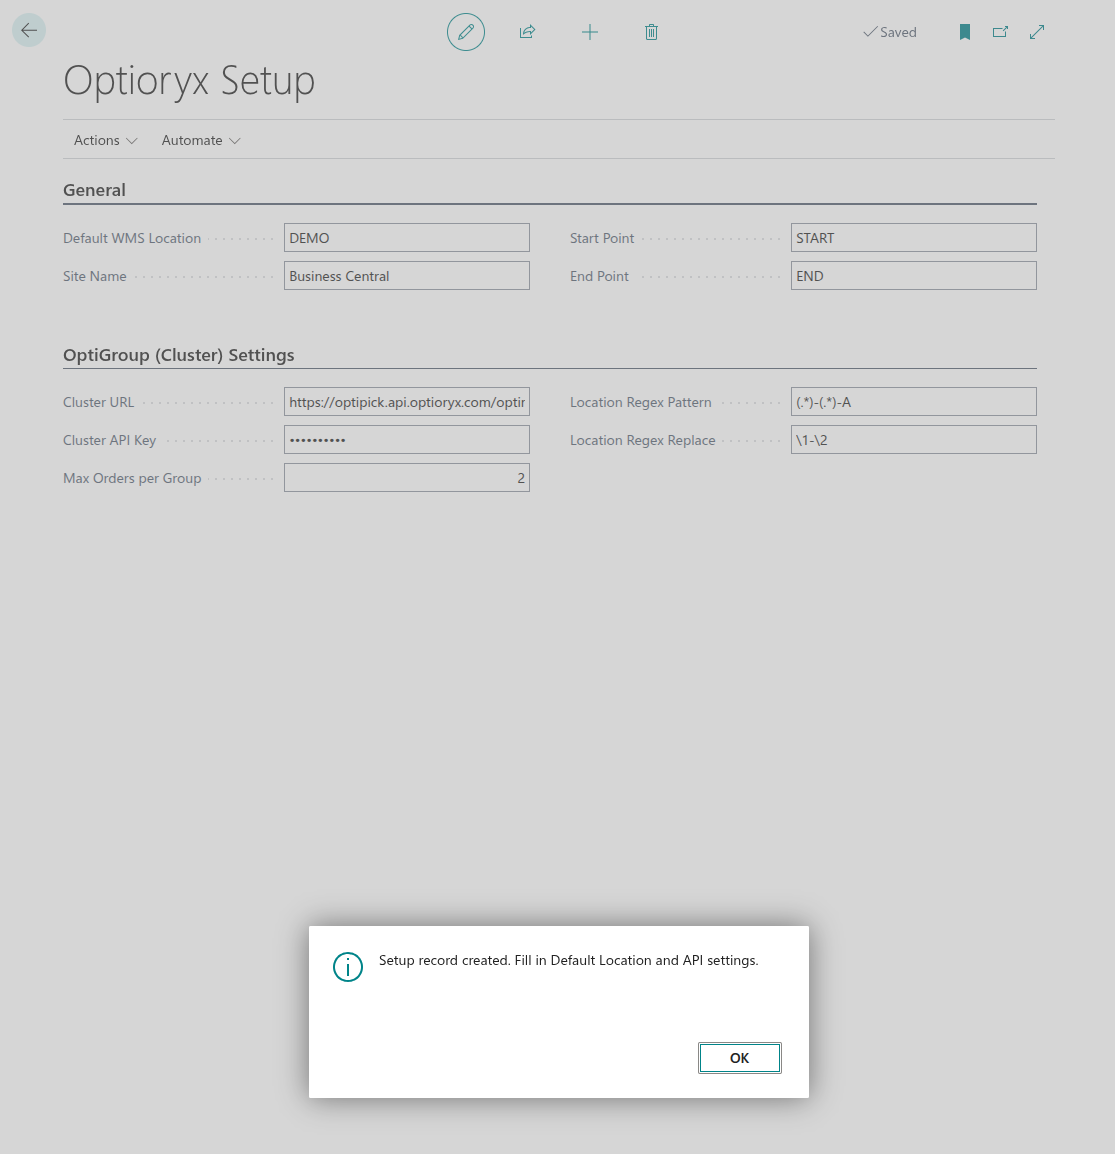
Configuration screen
We now create a page and corresponding table to set the different parameters for our API such as the endpoint URL, API key, warehouse name in BC, site name in OptiPick, start and end point of our picking routes, Max Orders (how many sales orders we can place in a shipment at most), and regular expression (used to transform the location bins from BC to location IDs that can be found in the OptiPick application).
namespace DefaultPublisher.AL;

table 50110 "Optioryx Setup"
{
    DataClassification = CustomerContent;

    fields
    {
        field(1; "Primary Key"; Code[10]) { DataClassification = SystemMetadata; }
        field(10; "Default Location"; Code[10]) { Caption = 'Default WMS Location'; InitValue = "DEMO"; }
        field(20; "Site Name"; Text[100]) { Caption = 'Site Name'; InitValue = "Business Central"; }
        field(30; "Start Point"; Text[50]) { Caption = 'Start Point'; InitValue = "START"; }
        field(40; "End Point"; Text[50]) { Caption = 'End Point'; InitValue = "END"; }

        field(100; "Cluster URL"; Text[250]) { Caption = 'Cluster URL'; InitValue = "https://optipick.api.optioryx.com/optimize/cluster?synchronous=true"; }
        field(110; "Cluster API Key"; Text[250]) { Caption = 'Cluster API Key'; ExtendedDatatype = Masked; InitValue = "<CENSORED>"; }

        field(120; "Max Orders"; Integer) { Caption = 'Max Orders per Group'; InitValue = 2; }
        field(130; "LocRegex Pattern"; Text[100]) { Caption = 'Location Regex Pattern'; InitValue = "(.*)-(.*)-A"; }
        field(140; "LocRegex Replace"; Text[100]) { Caption = 'Location Regex Replace'; InitValue = "\\1-\\2"; }
    }

    keys { key(PK; "Primary Key") { Clustered = true; } }

    trigger OnInsert()
    begin
        if "Primary Key" = '' then
            "Primary Key" := 'SETUP';
    end;
}
namespace DefaultPublisher.AL;

page 50111 "Optioryx Setup"
{
    PageType = Card;
    SourceTable = "Optioryx Setup";
    ApplicationArea = All;
    UsageCategory = Administration;

    layout
    {
        area(content)
        {
            group(General)
            {
                field("Default Location"; Rec."Default Location") { ApplicationArea = All; }
                field("Site Name"; Rec."Site Name") { ApplicationArea = All; }
                field("Start Point"; Rec."Start Point") { ApplicationArea = All; }
                field("End Point"; Rec."End Point") { ApplicationArea = All; }
            }
            group(OptiGroup)
            {
                Caption = 'OptiGroup (Cluster) Settings';
                field("Cluster URL"; Rec."Cluster URL") { ApplicationArea = All; }
                field("Cluster API Key"; Rec."Cluster API Key") { ApplicationArea = All; }
                field("Max Orders"; Rec."Max Orders") { ApplicationArea = All; }
                field("LocRegex Pattern"; Rec."LocRegex Pattern") { ApplicationArea = All; }
                field("LocRegex Replace"; Rec."LocRegex Replace") { ApplicationArea = All; }
            }
        }
    }

    actions
    {
        area(processing)
        {
            action(CreateOrOpen)
            {
                Caption = 'Create/Init';
                ApplicationArea = All;
                Image = New;
                trigger OnAction()
                var
                    s: Record "Optioryx Setup";
                begin
                    if not s.Get('SETUP') then begin
                        s.Init();
                        s.Insert();
                        Message('Setup record created. Fill in Default Location and API settings.');
                    end else
                        Page.Run(Page::"Optioryx Setup", s);
                end;
            }
        }
    }
}
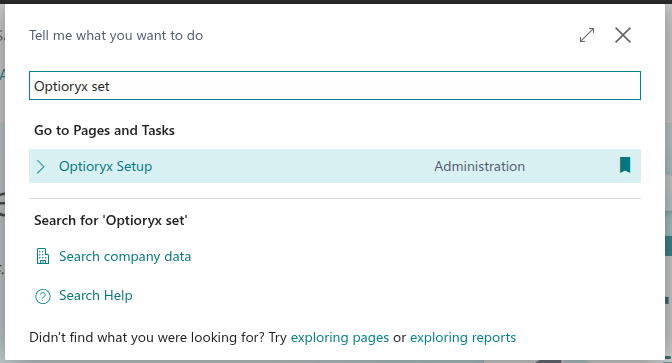
We can access this newly created page through ALT + Q:
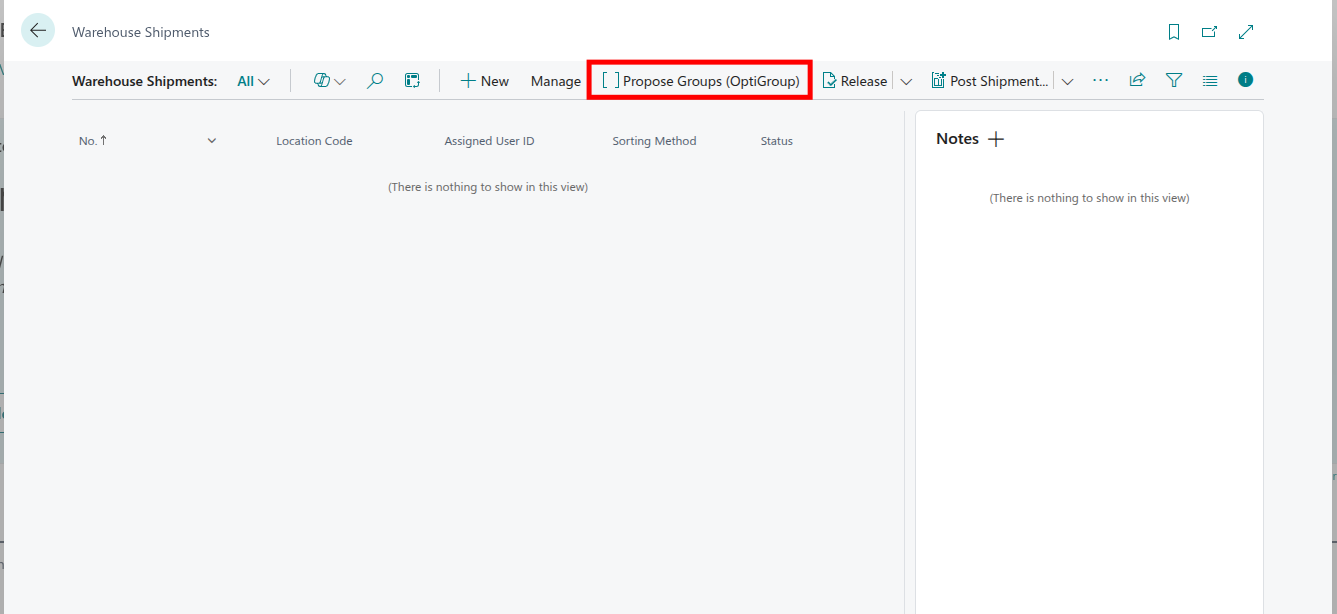
Adding a "Propose Groups" button to Warehouse Shipments
We will extend the Warehouse Shipment page:
pageextension 50131 "WhseShptList_OptiGroup" extends "Warehouse Shipment List"
{
    actions
    {
        addfirst(Processing)
        {
            action(OptiGroupPropose)
            {
                Caption = 'Propose Groups (OptiGroup)';
                ApplicationArea = All;
                Image = Group;
                Promoted = true;
                PromotedCategory = Process;
                PromotedIsBig = true;

                trigger OnAction()
                var
                    Mgt: Codeunit "OptiGroup Mgt";
                begin
                    Mgt.RunForReleasedNotOnShipment();
                end;
            }
        }
    }
}
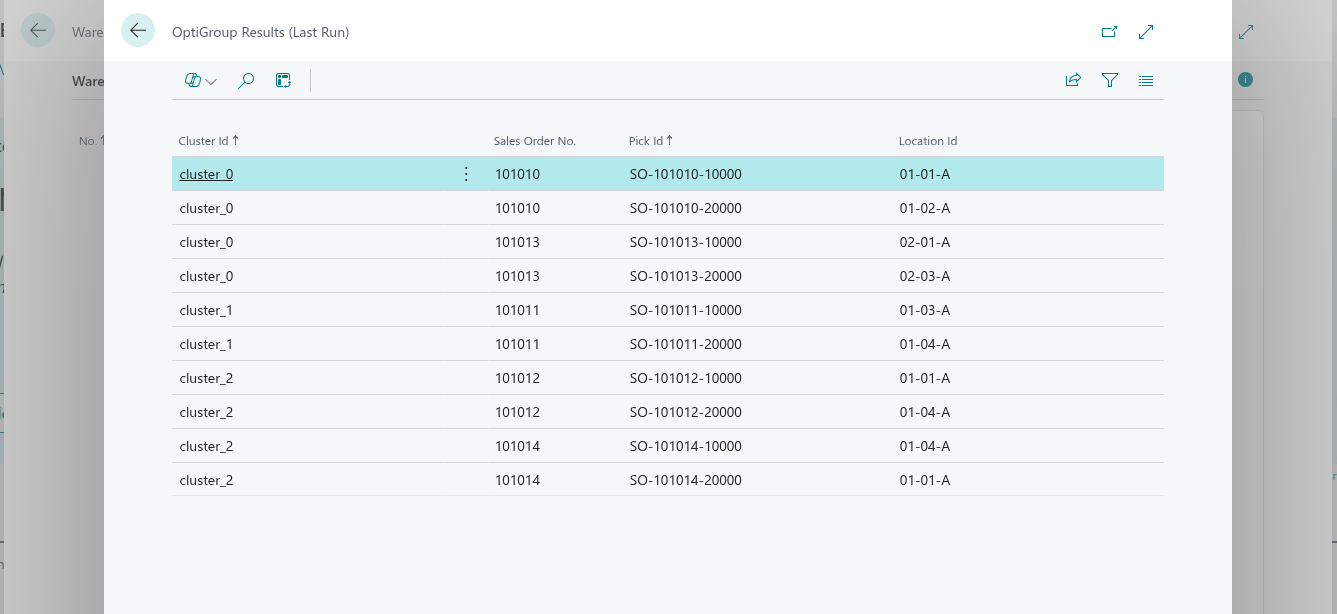
Clustering result screen
This page will show the results of our API response (generated after clicking on the "Propose Group" button of the previous step) in a more visual way.
namespace DefaultPublisher.AL;

table 50112 "OptiGroup Result Line"
{
    DataClassification = CustomerContent;

    fields
    {
        field(20; "Cluster Id"; Text[50]) { }
        field(30; "Order No."; Code[20]) { Caption = 'Sales Order No.'; }
        field(40; "Pick Id"; Text[50]) { }
        field(50; "Location Id"; Text[50]) { }
    }
    keys
    {
        key(PK; "Cluster Id", "Pick Id") { Clustered = true; }
    }
}
namespace DefaultPublisher.AL;

page 50113 "OptiGroup Results"
{
    PageType = List;
    ApplicationArea = All;
    SourceTable = "OptiGroup Result Line";
    Caption = 'OptiGroup Results (Last Run)';
    Editable = false;

    layout
    {
        area(content)
        {
            repeater(Grp)
            {
                field("Cluster Id"; Rec."Cluster Id") { ApplicationArea = All; }
                field("Order No."; Rec."Order No.") { ApplicationArea = All; }
                field("Pick Id"; Rec."Pick Id") { ApplicationArea = All; }
                field("Location Id"; Rec."Location Id") { ApplicationArea = All; }
            }
        }
    }
}
CodeUnit to call our API
We'll import a few namespaces first:
namespace DefaultPublisher.AL;

using Microsoft.Sales.Document;
using Microsoft.Warehouse.Document;
using Microsoft.Warehouse.Structure;
The "main" procedure is shown below. After declaring the variables, we check if the configuration screen has been filled in properly, if not we show an error message. Afterwards, we start creating a JsonObject that will serve as our request payload. The root object will contain a site_name, start_points, end_points a nested json object with parameters and a list of picks. To the parameters we add max_orders which is a simple integer and a location_regex which is a list of list of two elements corresponding to a match and substitution regex respectively, to construct this a sub-procedure is called. Then we iterate over all Sale Headers that are in "Released" status. For each of these headers we first check if it has not yet been assigned to a Warehouse Shipment and if the Sales Header corresponds to the correct warehouse (one of the parameters we configured in the configuration screen). If both checks pass, we iterate over its Sale Lines, each such line corresponds to one pick object for our API. For each Sale Line, we get the Bin Location that is associated with the ordered SKU and then create a pick object (JSON) to add to our picks list. When this loop is done, we can add the picks list to our payload, add the necessary HTTP headers for our API request and post this to our API. Finally, we create OptiGroup result records and visualise these.
procedure RunForReleasedNotOnShipment()
var
    Setup: Record "Optioryx Setup";
    SalesHdr: Record "Sales Header";
    SalesLine: Record "Sales Line";
    WhseShptLine: Record "Warehouse Shipment Line";
    BinContent: Record "Bin Content";

    Http: HttpClient;
    Resp: HttpResponseMessage;
    Req: HttpRequestMessage;
    Cnt: HttpContent;
    Hdrs: HttpHeaders;

    Payload: JsonObject;
    Params: JsonObject;
    Picks: JsonArray;
    PickObj: JsonObject;

    BodyTxt: Text;
    RunId: Guid;
    LinesFound: Integer;

    ApiKey: Text;

    // Map pick_id -> order no (so we can reconstruct if API only returns pick_ids)
    PickToOrder: Dictionary of [Text, Code[20]];
    binCode: Code[20];  // Declare binCode
    pickId: Text[50];    // Declare pickId
begin
    if not Setup.FindFirst() then
        Error('Open "Optioryx Setup" and create the setup first.');

    if (Setup."Cluster URL" = '') or (Setup."Cluster API Key" = '') then
        Error('Cluster URL/API Key missing in setup.');
    if Setup."Default Location" = '' then
        Error('Default Location is empty in setup.');

    // --- Build request payload ---
    Payload.Add('site_name', Setup."Site Name");
    Payload.Add('start_points', Setup."Start Point");
    Payload.Add('end_points', Setup."End Point");

    Params.Add('max_orders', Setup."Max Orders");

    // Optional location_regex parameter
    if (Setup."LocRegex Pattern" <> '') and (Setup."LocRegex Replace" <> '') then begin
        AddRegexParam(Params, Setup."LocRegex Pattern", Setup."LocRegex Replace");
    end;

    Payload.Add('parameters', Params);

    // Collect picks from released SOs at Default Location not already on a Whse Shipment
    PickToOrder := PickToOrder; // no Create() needed
    SalesHdr.Reset();
    SalesHdr.SetRange("Document Type", SalesHdr."Document Type"::Order);
    SalesHdr.SetRange(Status, SalesHdr.Status::Released);

    if SalesHdr.FindSet() then
        repeat
            if HasReleasedLinesAtLocation(SalesHdr, Setup."Default Location")
               and not ExistsOnWhseShipment(SalesHdr) then begin
                SalesLine.SetRange("Document Type", SalesHdr."Document Type");
                SalesLine.SetRange("Document No.", SalesHdr."No.");
                SalesLine.SetRange(Type, SalesLine.Type::Item);
                SalesLine.SetRange("Location Code", Setup."Default Location");

                if SalesLine.FindSet() then
                    repeat
                        if SalesLine.Quantity > 0 then begin
                            binCode := GetBestBinForLine(SalesLine);
                            if binCode <> '' then begin
                                Clear(PickObj);  // New JsonObject for each pick
                                pickId := StrSubstNo('SO-%1-%2', SalesHdr."No.", SalesLine."Line No.");
                                PickObj.Add('pick_id', pickId);
                                PickObj.Add('location_id', binCode);
                                PickObj.Add('wave_id', 1);
                                PickObj.Add('order_id', SalesHdr."No.");
                                Picks.Add(PickObj);

                                PickToOrder.Add(pickId, SalesHdr."No.");
                                LinesFound += 1;
                            end;
                        end;
                    until SalesLine.Next() = 0;
            end;
        until SalesHdr.Next() = 0;

    if LinesFound = 0 then
        Error('No candidate sales lines found at location %1 (released and not on a warehouse shipment).', Setup."Default Location");

    Payload.Add('picks', Picks);

    // --- HTTP call ---
    Payload.WriteTo(BodyTxt);
    Cnt.WriteFrom(BodyTxt);

    // --- Content headers (body only) ---
    Cnt.GetHeaders(Hdrs);
    // Do NOT clear here; this is the content header collection
    if Hdrs.Contains('Content-Type') then
        Hdrs.Remove('Content-Type');
    if Hdrs.Contains('Content-Length') then
        Hdrs.Remove('Content-Length');
    Hdrs.Add('Content-Type', 'application/json');

    // --- Request headers (NOT content headers) ---
    Hdrs := Http.DefaultRequestHeaders(); // switch Hdrs to the request header collection
    // If Http is reused across calls, remove old values first
    if Hdrs.Contains('Accept') then
        Hdrs.Remove('Accept');
    if Hdrs.Contains('x-api-key') then
        Hdrs.Remove('x-api-key');
    if Hdrs.Contains('Authorization') then
        Hdrs.Remove('Authorization');

    Hdrs.Add('Accept', 'application/json');
    Hdrs.Add('x-api-key', Setup."Cluster API Key");
    Hdrs.TryAddWithoutValidation('User-Agent', 'curl/8.5.0');

    // DebugHttpRequest(Http, Setup."Cluster URL", Cnt, BodyTxt);

    // --- Send with Http.Post ---
    Http.Timeout := 120000;
    if not Http.Post(Setup."Cluster URL", Cnt, Resp) then
        Error('HTTP POST failed.');

    Resp.Content().ReadAs(BodyTxt);
    if not Resp.IsSuccessStatusCode() then
        Error('OptiGroup error %1: %2', Resp.HttpStatusCode(), CopyStr(BodyTxt, 1, 2048));

    // --- Parse & store results ---
    RunId := CreateGuid();
    StoreGroupingResult(RunId, BodyTxt, PickToOrder);

    // Show results for this run
    ShowResultsForRun(RunId);
end;
The sub-procedure to construct the location_regex for the parameters is shown below:
procedure AddRegexParam(var Params: JsonObject; Pattern: Text; Replace: Text)
var
    regexOuter: JsonArray;
    regexPair: JsonArray;
    tok: JsonToken;
begin
    // Only add if both are non-empty (avoid server complaining about invalid pattern)
    if (Pattern = '') or (Replace = '') then
        exit;

    regexPair.Add(Pattern);   // JSON string
    regexPair.Add(Replace);   // JSON string

    if Params.Contains('location_regex') then begin
        Params.Get('location_regex', tok);
        regexOuter := tok.AsArray();
    end;

    regexOuter.Add(regexPair);
    if Params.Contains('location_regex') then
        Params.Remove('location_regex');

    Params.Add('location_regex', regexOuter);
end;
Both check performed on a Sales Header to confirm whether it can be clustered (it is associated to the correct warehouse we configured and has not yet been clustered before) are shown below.
local procedure HasReleasedLinesAtLocation(SalesHdr: Record "Sales Header"; LocationCode: Code[10]): Boolean
var
    SL: Record "Sales Line";
begin
    SL.SetRange("Document Type", SalesHdr."Document Type");
    SL.SetRange("Document No.", SalesHdr."No.");
    SL.SetRange(Type, SL.Type::Item);
    SL.SetRange("Location Code", LocationCode);
    exit(SL.FindFirst());
end;

local procedure ExistsOnWhseShipment(SalesHdr: Record "Sales Header"): Boolean
var
    WSL: Record "Warehouse Shipment Line";
begin
    // Source Type 37 = Sales Line; Source Subtype 1 = Order
    WSL.SetRange("Source Type", 37);
    WSL.SetRange("Source Subtype", 1);
    WSL.SetRange("Source No.", SalesHdr."No.");
    exit(WSL.FindFirst());
end;
The sub-procedure below retrieves the corresponding location. In this case we will just take the first one in case multiple are associated, but smarter logic such as allocating the location with the lowest stock that is still sufficient for the specific Sales Order can of course be implemented as well. If no location is found, we return an empty string and handle this in an if-statement within the main loop, but ideally an error is thrown.
local procedure GetBestBinForLine(SalesLine: Record "Sales Line"): Code[20]
var
    BC: Record "Bin Content";
begin
    if SalesLine."Bin Code" <> '' then
        exit(SalesLine."Bin Code");

    BC.SetRange("Location Code", SalesLine."Location Code");
    BC.SetRange("Item No.", SalesLine."No.");
    BC.SetRange(Default, true);
    if BC.FindFirst() then
        exit(BC."Bin Code");

    exit('');
end;
The function below parses the response that is returned by our API to create different "OptiGroup Result" records (one of the data tables we created in a previous step).
local procedure StoreGroupingResult(RunId: Guid; ResponseTxt: Text; PickToOrder: Dictionary of [Text, Code[20]])
var
    R: Record "OptiGroup Result Line";
    Root: JsonObject;
    Tok: JsonToken;
    Clusters: JsonArray;
    ClusterTok: JsonToken;
    ClusterObj: JsonObject;
    PicksTok: JsonToken;
    PicksArr: JsonArray;
    ElemTok: JsonToken;
    LocArr: JsonArray;

    ClusterIdTxt: Text;
    PickIdTxt: Text;
    OrderNo: Code[20];
    LocIdToken: JsonToken;
    LocId: Text;
    i: Integer;
    j: Integer;
    PObj: JsonObject;
begin
    // Remove previous results for this RunId
    if R.FindSet() then
        repeat
            R.Delete();
        until R.Next() = 0;

    // Message(ResponseTxt);

    // Parse JSON
    if not Root.ReadFrom(ResponseTxt) then
        Error('Could not parse OptiGroup response.');

    if not Root.Get('optimal_clusters', Tok) then
        Error('Unexpected OptiGroup response shape.\n%1', CopyStr(ResponseTxt, 1, 10000));

    Clusters := Tok.AsArray();

    for i := 0 to Clusters.Count() - 1 do begin
        Clusters.Get(i, ClusterTok);
        ClusterObj := ClusterTok.AsObject();
        ClusterIdTxt := GetTextProp(ClusterObj, 'list_id');

        // Case A: picks array
        ClusterObj.Get('picks', PicksTok);
        PicksArr := PicksTok.AsArray();
        for j := 0 to PicksArr.Count() - 1 do begin
            PicksArr.Get(j, ElemTok);
            PObj := ElemTok.AsObject();

            PickIdTxt := GetTextProp(PObj, 'pick_id');
            LocArr := PObj.GetArray('location_id');
            if LocArr.Count() > 0 then begin
                LocArr.Get(0, LocIdToken);
                LocId := LocIdToken.AsValue().AsText();
            end else
                LocId := ''; // fallback
            OrderNo := CopyStr(GetTextProp(PObj, 'order_id'), 1, 20);

            if (OrderNo = '') and (PickIdTxt <> '') and PickToOrder.ContainsKey(PickIdTxt) then
                OrderNo := PickToOrder.Get(PickIdTxt);

            if (OrderNo <> '') and (PickIdTxt <> '') then begin
                R.Init();
                R."Cluster Id" := ClusterIdTxt;
                R."Order No." := OrderNo;
                R."Pick Id" := PickIdTxt;
                R."Location Id" := LocId;
                // Message('About to insert: ClusterId=%1, PickId=%2, LocationId=%3', ClusterIdTxt, PickIdTxt, LocId);
                R.Insert();
            end;
        end;
    end;
end;
Which makes use of the procedure below:
local procedure GetTextProp(var Obj: JsonObject; Name: Text): Text
var
    Tok: JsonToken;
begin
    if Obj.Get(Name, Tok) and Tok.IsValue() then
        exit(Tok.AsValue().AsText());
    exit('');
end;
The final sub procedure makes the table view appear:
local procedure ShowResultsForRun(RunId: Guid)
var
    R: Record "OptiGroup Result Line";
    P: Page "OptiGroup Results";
begin
    P.SetTableView(R);
    Page.Run(Page::"OptiGroup Results", R);
end;
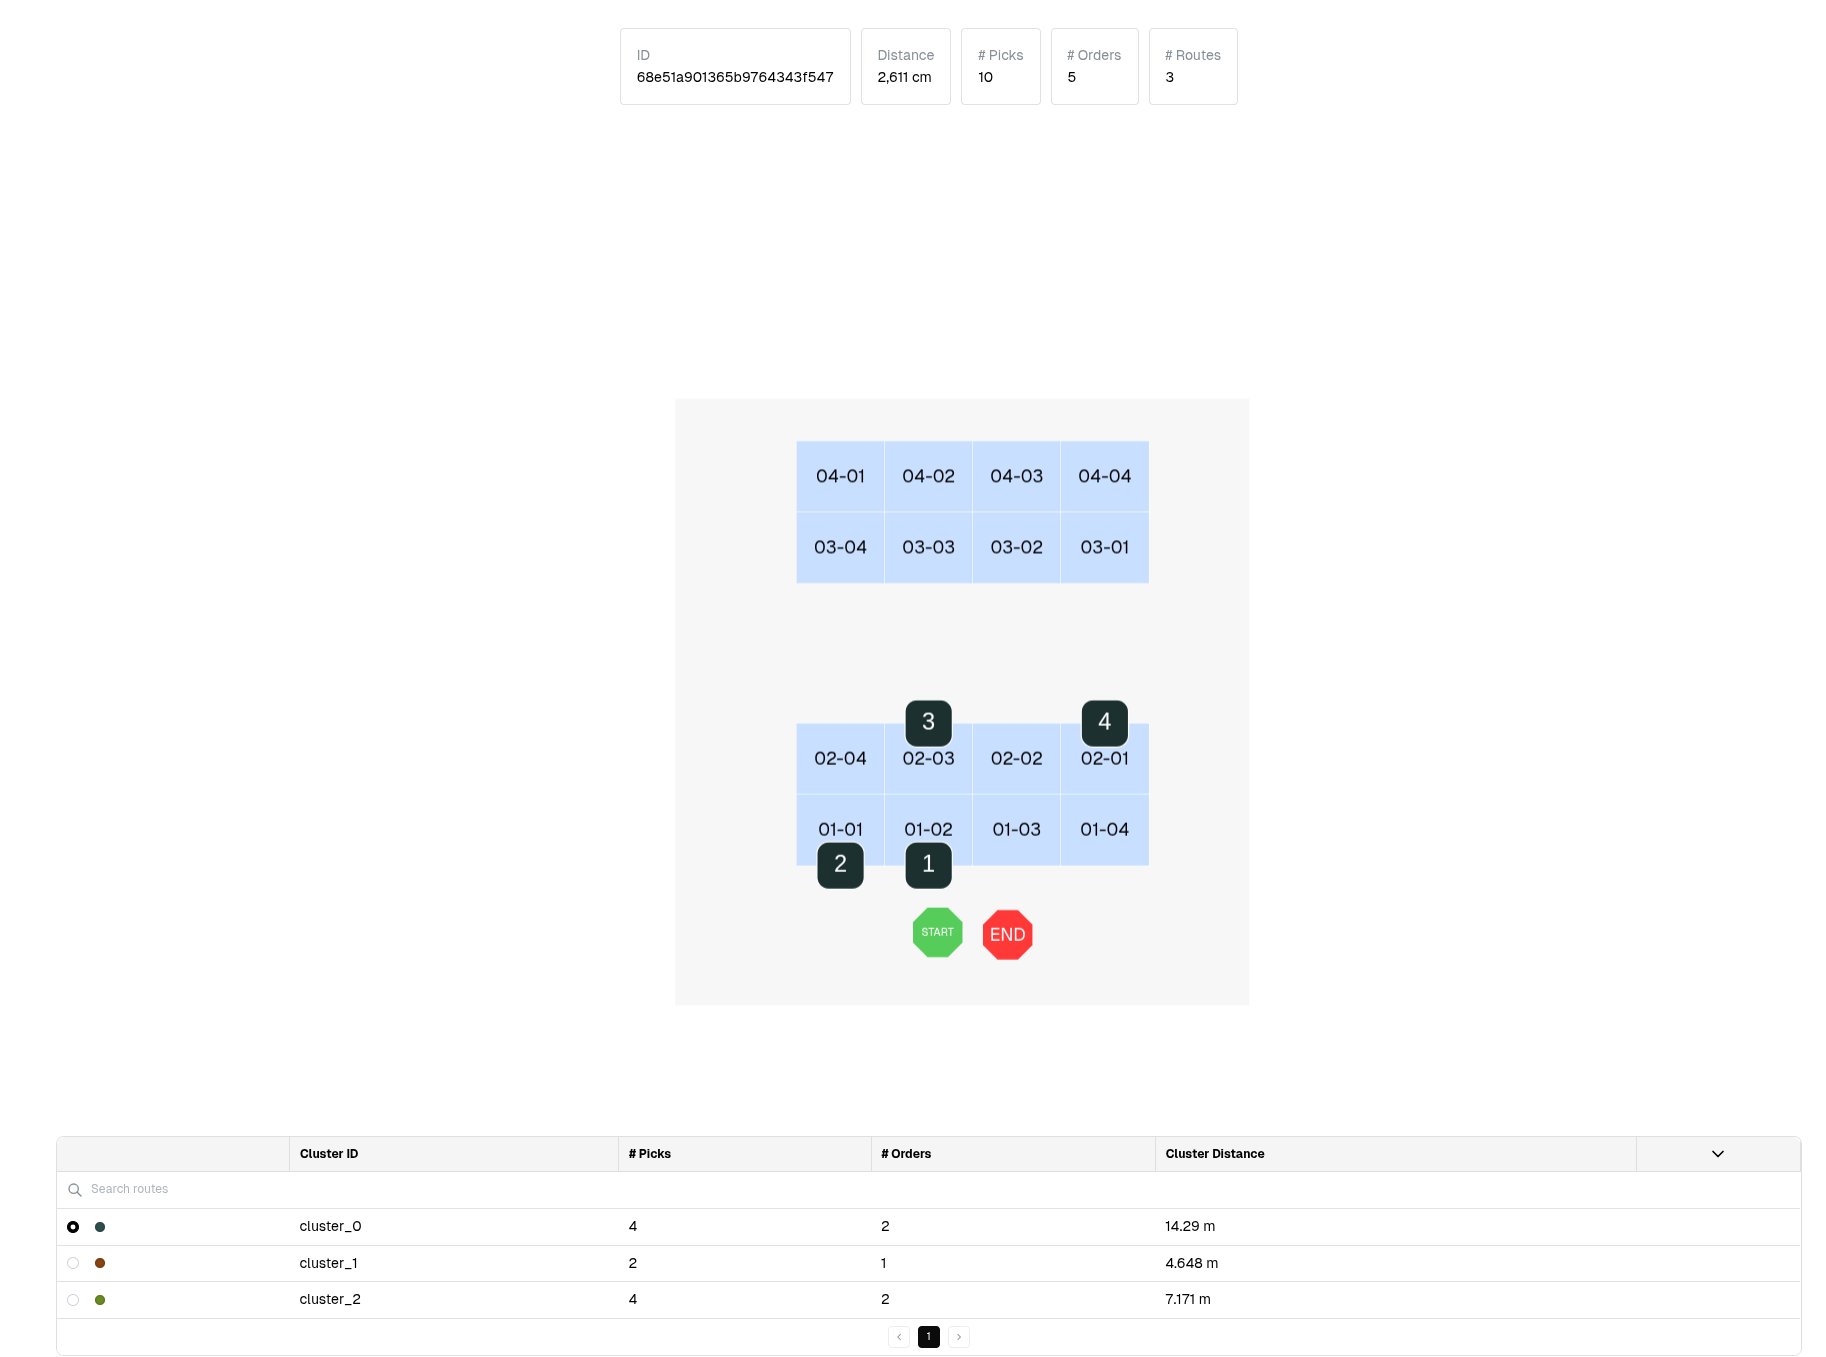
This is it! We now have an additional button in the Warehouse Shipments page that retrieves all Released Sales Orders that have not yet been grouped into Shipments and sends the necessary information to our API, afterwards the results of our optimization are displayed visually.
These results can also be visually displayed on the floor plan through the Operational Analysis page in our web application:
Field mapping (recap)
| OptiPick JSON | BC Source |
|---|---|
picks[].pick_id | Stable key you generate, e.g. WSH-[ShipmentNo]-[LineNo] or WPK-[PickNo]-[ActivityLineNo] |
picks[].order_id | Sales Order No. (Sales Header"."No.") or Shipment's Source No. |
picks[].location_id | Warehouse Activity Line"."Bin Code" (post-pick or simulated) |
picks[].wave_id | Your wave bucket (e.g., "DHL-2025-10-07") or Shipment No. group |
picks[].list_id | Original grouping label (e.g., Warehouse Shipment No.) for as-is comparison/fallback |
picks[].asis_sequence | BC's as-is order number you compute from Bin Ranking (or original activity line order) |
site_name | OptiPick floorplan name |
parameters.location_regex | Regex pairs to map BC Bin Codes → OptiPick floorplan node IDs |
Where to call OptiPick in BC?
Pick one of these patterns (most teams start with A, then move to B):
A) Pragmatic/POC (lowest friction)
-
Create Warehouse Shipments as usual for your dispatch window.
-
Run Create Pick on all those shipments.
-
Read Warehouse Activity Lines across all created picks → build one OptiPick request (wave-level).
-
Apply results:
-
If clusters match existing routes, re-sequence the pick lines.
-
If clusters re-bucket orders, delete the temporary picks and re-create one pick per cluster (Pick Worksheet / codeunit).
B) Clean "simulation" approach (more dev work)
Call BC's pick logic in temporary mode to resolve Bin Codes without actually creating picks.
Send the full wave to OptiPick.
Create one Warehouse Pick per returned cluster directly.
Both give OptiPick bin-accurate inputs. A) is easiest to implement; B) avoids throwaway picks.
Persisting the results (BC)
-
Grouping: create one Warehouse Pick per OptiPick cluster. Picks may span multiple Warehouse Shipments (standard BC allows this through the Pick Worksheet/creation codeunit).
-
Sequence: update each pick's activity lines to follow OptiPick's sequence (store an "Optim Sequence" in a custom field or reuse "Sorting" if suitable).
-
Traceability: store run_id / timestamp on:
a lightweight "OptiPick Run" header,
and/or on each Warehouse Pick (custom field),
plus save the raw request/response blob for audit/KPIs.
- Fallback: retain the original "as-is" sequence (Bin Ranking order) so the pick can still be executed unchanged if needed.
Setup checklist (BC)
-
Read Authorizations: Sales Header/Line, Warehouse Shipment, Warehouse Pick, Warehouse Activity Line, Bin, Bin Content.
-
Write Authorizations: Warehouse Pick & Activity Lines (or temp picks), custom tables (OptiPick Setup/Run/Results).
-
BC Warehouse configuration: (i) Location with Bin Mandatory, Require Shipment, Require Pick; (ii) Default Bin Selection = Fixed Bin (for predictable allocation); (iii) Bin Ranking populated (your "as-is" baseline)
-
Connectivity: Allow outbound HTTPS to your OptiPick endpoints; set API key in a secured field (Masked).
-
Feature toggle: Add a simple setup flag (e.g., "OptiPick Enabled") so ops can disable quickly.
-
Floorplan: Confirm regex maps Bin Code → floorplan node for every pick location.
Additional Tips & Tricks
Reliability & monitoring
- Retries/backoff for HTTP 429/5xx.
- Timeouts + circuit breaker → fall back to BC's as-is.
- Log: selected wave scope, request hash, HTTP code, run id, decision (optimized vs fallback).
Idempotency
- If you re-call OptiPick for the same wave, ensure you don't duplicate Warehouse Picks: either delete & rebuild or upsert by Run ID.
Performance
- Filter at the DB: get only Released SOs and their Shipment/Pick lines for the wave.
Floorplan fidelity
- If an item can be in multiple bins, you can pass multiple location_id candidates (OptiPick can choose the best).
- Keep regexes updated as bin naming evolves.
Security
- Keep API keys in a masked field
- Restrict who can open/maintain the Setup page.